
How to set up shipping rates on shopify

In e-commerce, the customer journey doesn’t end when a shopper clicks “add to cart.” The real make-or-break moment happens at checkout — where your shipping setup can decide whether a sale goes through or gets abandoned. For Shopify merchants, knowing how to set up shipping rates on Shopify is more than just a technical step; it’s a key part of building trust, maintaining healthy profit margins, and improving conversion rates.
Set rates too high, and customers will leave for competitors with better deals. Set them too low, and your profits slowly disappear. The goal is to create a system that’s fair for customers, sustainable for your business, and transparent across every order. This guide walks you through a clear, practical process to do exactly that.
Step-by-Step: How to Set Up Shipping Rates on Shopify
A robust shipping setup is built on a solid foundation. Before you even think about pricing, it's essential to ensure your store's backend information is accurate and organized.
Step 1: Laying the Foundation: Prepare Your Store Settings
Think of this step as gathering all your ingredients before you start cooking. Getting these details right from the start will prevent major headaches and inaccuracies later.
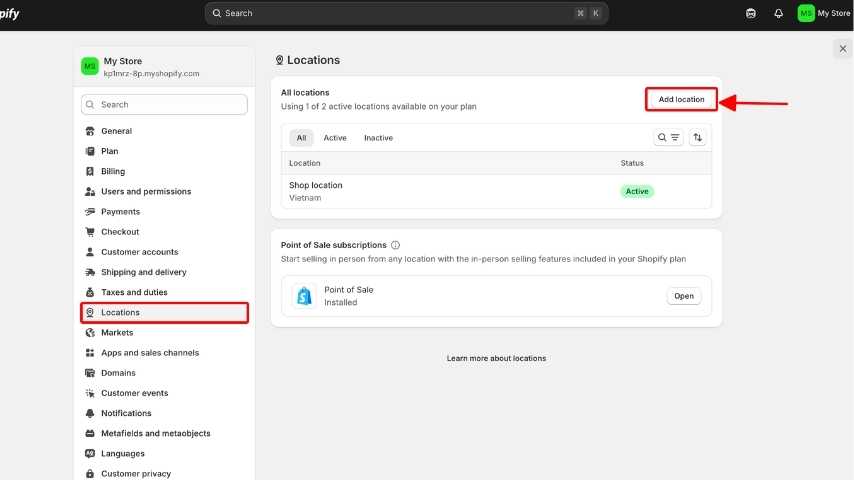
- Set Up Shipping Locations and Zones: Your "shipping location" is the origin point of your shipments—your warehouse, office, home, or a third-party logistics (3PL) partner's facility. Shopify uses this address as the starting point for all shipping calculations. "Shipping zones" are the geographical areas you ship to (e.g., domestic, Europe, North America). You need to define where you're shipping from before you can define where you're shipping to.
- Add Accurate Product Weights and Dimensions: This is non-negotiable, especially if you plan to use real-time carrier rates. Carriers like USPS, DHL, and UPS base their pricing on package weight and dimensions (dimensional weight). If you leave this information blank, Shopify cannot request an accurate quote, leading to errors at checkout. Be meticulous and weigh each product, including its typical packaging.
- Verify Address and Fulfillment Settings: Double-check that your primary business address is correct in Shopify's settings. This ensures tax and shipping calculations are precise. Also, review your fulfillment settings to align with your operational workflow.
- A Note on Shopify Plans: It's important to know that some advanced shipping features are plan-dependent. The ability to offer real-time carrier-calculated rates from third-party carriers is built into the Shopify, Advanced Shopify, and Shopify Plus plans. If you're on a more basic plan, you can add this functionality for an additional monthly fee or by using a third-party app from the Shopify App Store.
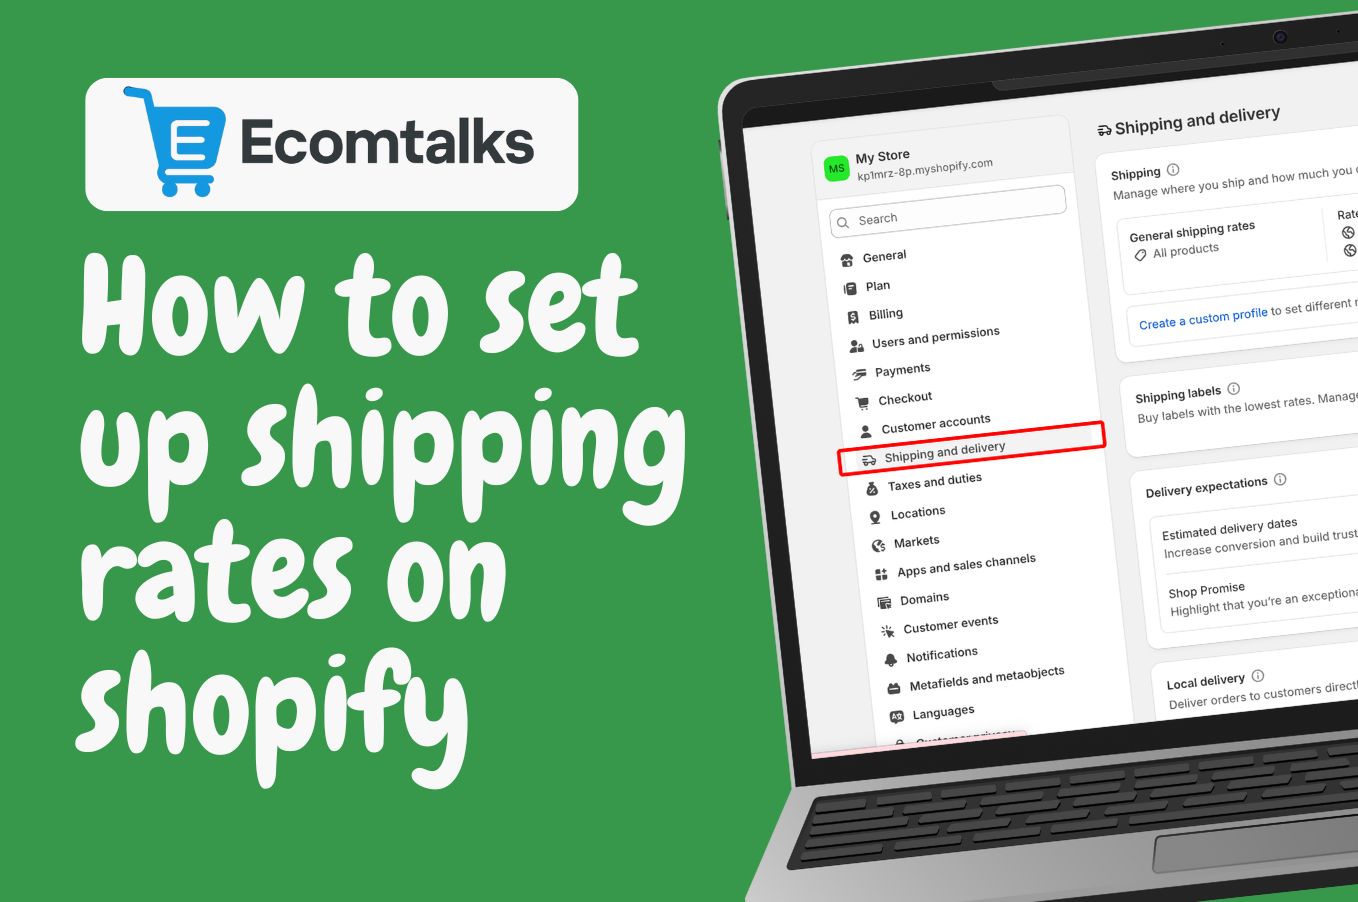
Step 2: Navigate to the Shipping Hub in Your Shopify Admin
With your foundational data in place, it's time to head to the central control panel for all things shipping.
- From your Shopify Admin dashboard, look to the bottom-left corner and click on Settings.
- In the menu that appears, select Shipping and Delivery.

This screen is your command center. Here, you'll manage your shipping profiles, create zones, set rates, and configure every aspect of your shipping logic.
Step 3: Organize with Shipping Profiles
Shopify's default setting is to have one general shipping profile that applies the same rules to all your products. For many businesses, however, this "one-size-fits-all" approach isn't practical. This is where custom shipping profiles become incredibly useful.
- The Role of Shipping Profiles: Think of shipping profiles as different "rulebooks" for different categories of products. They allow you to apply unique shipping rates and zones to specific items. For instance, you wouldn't want to apply the same shipping rules to a large, heavy piece of furniture as you would to a lightweight t-shirt.
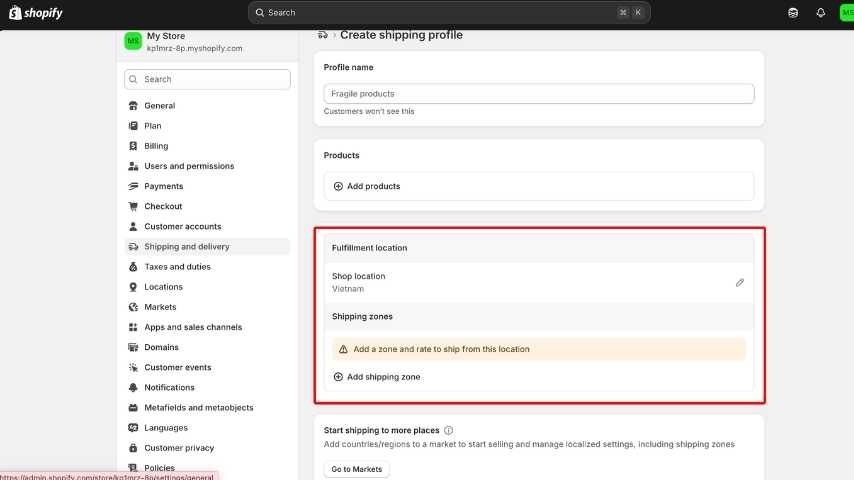
- How to Create a Profile:
- Under the "Shipping" section, you'll see your general profile. Below it, click Create new profile.
- Give your profile a clear name (e.g., "Heavy Goods," "Fragile Items," "T-Shirts").
- In the "Products" section of this new profile, click Add products and select all the items that should follow this specific set of shipping rules.

- Example in Action: Imagine you sell both posters shipped in tubes from your studio and mugs that are dropshipped from a print-on-demand supplier. You would create one profile for the posters with rates from your location, and a second profile for the mugs with rates originating from your supplier's location.
Step 4: Define Your Reach with Shipping Zones
Now that you have your product groups sorted into profiles, you need to define where you're willing to ship them. Each shipping profile will contain its own set of shipping zones.
- Defining and Adding a Zone: A shipping zone is simply a group of countries or regions that you want to share the same shipping rates.
- Inside a shipping profile, find the section for shipping origins and click Create shipping zone.
- Give the zone a descriptive name (e.g., "United States," "UK & Ireland," "Rest of World").
- Check the boxes next to the countries and/or regions (states, provinces) you want to include in this zone.
- Click Done.
- Strategic Zone Customization: You can get as granular as you need. A common strategy is to create a domestic zone for your own country, another zone for neighboring countries with similar shipping costs, and a broader "international" zone for everywhere else. This allows you to set more accurate and competitive rates for each market.
Step 5: Set Your Prices by Adding Shipping Rates
This is where your strategy comes to life. Once a zone is created, Shopify will prompt you to add rates for it. You have several powerful options to choose from.
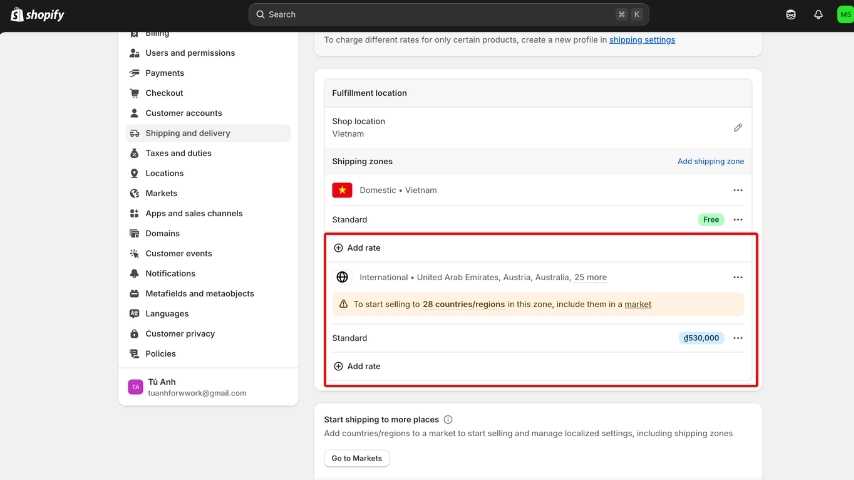
- Flat Rate – The Simple & Predictable Choice: A flat rate is a fixed price for shipping, regardless of the items in the cart. This is excellent for its simplicity and transparency. Customers know exactly what to expect.
- How to set it up: Click Add rate, give it a name (e.g., "Standard Ground Shipping"), and enter the price. You can also add conditions. For example, you could create a "Standard" $5 flat rate for orders under $75 and an "Express" $15 flat rate.
- Free Shipping – The Ultimate Conversion Booster: Offering free shipping is one of the most effective marketing tools in e-commerce.
- How to set it up: When adding a rate, name it "Free Shipping" and leave the price at $0.00. The most powerful way to use this is to set a condition. Click Add conditions, select "Based on order price," and set a minimum amount (e.g., free shipping on orders over $100). This encourages customers to add more to their cart to qualify, boosting your average order value (AOV).
- Calculated Rates – The Accuracy King: Also known as real-time rates, this option fetches live pricing directly from carriers like USPS, UPS, DHL Express, or Canada Post at the moment of checkout. The rate is calculated based on the customer's location and the total weight and dimensions of the items in their cart.
- How to set it up: Click Add rate and choose Use carrier or app to calculate rates. Select your desired carrier from the dropdown. This method ensures you are not losing money or overcharging, as it passes the exact cost on to the customer.
Step 6: Don't Launch Blind—Test Your Shipping Setup
You've done the hard work, but don't make your setup live until you've thoroughly tested it. A small mistake here could cost you sales or create customer support nightmares.
- How to Verify Rates: The best way to test is to simulate a customer's experience. You can create a draft order or go through your live storefront, add different products to the cart, and proceed to checkout with various addresses (one for each of your shipping zones). Ensure the rates that appear are the ones you expect.
- Troubleshooting Guide: If the correct rates aren't showing up, run through this mental checklist:
- Does the product have a weight assigned to it? (Most common issue for calculated rates).
- Is the product included in the correct shipping profile?
- Is the customer's shipping address located within a zone you have created and added rates to?
- Are there any conflicting rules or conditions?
Advanced Shipping Options: Leveling Up Your Strategy
For growing businesses or stores with complex needs, Shopify's built-in tools can be enhanced with more advanced features and apps.
- Real-Time Carrier-Calculated Rates: As mentioned, this is the gold standard for accuracy. Beyond just passing on the cost, it builds trust. When a customer sees a rate from a recognized carrier like UPS, it feels more legitimate than an arbitrary flat fee.
- Set Conditional Rules: Go beyond simple flat rates by setting price-based or weight-based conditions. This allows for a tiered shipping strategy. For example:
- Weight-based: $5 shipping for orders 0-2 kg, $10 for 2.1-5 kg, $20 for anything heavier.
- Price-based: $10 shipping for orders under $50, $5 for orders between
50−50−99, and free for orders over $100.
- Integrate Third-Party Shipping Apps: The Shopify App Store is filled with powerful applications that can supercharge your shipping workflow.
- ShipStation or Shippo: These platforms are shipping management hubs. They import your orders and allow you to compare rates across multiple carriers, print labels in bulk, and automate tracking updates, saving you immense amounts of time.
- Easyship: A fantastic solution for international sellers. Easyship can calculate and display duties and taxes directly at checkout, eliminating surprises for your international customers and increasing conversion rates.
- Sendcloud: A popular choice in Europe, Sendcloud offers a comprehensive suite for automating everything from picking and packing to label printing, tracking, and managing returns.
Best Practices for a Winning Shopify Shipping Strategy
A great setup is more than just functional; it's strategic. Keep these principles in mind.
- Embrace Transparency: Be upfront about your shipping costs. A surprise shipping fee revealed on the final checkout page is a leading cause of cart abandonment. Include a link to a clear shipping policy in your store's header or footer.
- Leverage Shipping Thresholds: Use free or discounted shipping as a lever to increase your average order value. Analyze your current AOV and set your free shipping threshold just above it (e.g., if your AOV is $80, set the threshold at $100).
- Conduct Regular Audits: Shipping is not a "set it and forget it" task. Carriers typically update their rates at least once a year. Schedule a bi-annual review of your rates to ensure they still align with your costs and protect your margins.
- Localize for International Markets: If you sell globally, what works in one country may not work in another. Research customer expectations and carrier reliability in your key international markets and create specific zones and rates to cater to them.
Common Mistakes to Avoid (And How to Fix Them)
Steer clear of these common pitfalls that can derail an otherwise solid shipping setup.
- Ignoring Product Weights: The most frequent error. Forgetting to add weights makes real-time calculations impossible and can lead to you severely undercharging for heavy items on a flat-rate plan.
- Forgetting About Packaging Weight: The weight you enter should be the shippable weight—the product plus the box, mailer, and any packing materials. Those few extra ounces can push a package into a more expensive shipping tier.
- Creating Overly Complex Rules: While profiles and zones are powerful, creating dozens of overlapping and confusing rules can lead to errors. Start simple and only add complexity where it's truly needed.
- Skipping the Final Test: Never assume your setup works. A five-minute test can save you hours of fixing problems and dealing with unhappy customers after you launch.
Conclusion: Your Partner in Growth
Mastering how to set up shipping rates on Shopify transforms shipping from a mere operational cost into a strategic asset. By meticulously preparing your store's data, building logical profiles and zones, and selecting a rate strategy that aligns with your business goals, you create a checkout experience that is clear, fair, and designed to convert. This foundation of trust not only encourages customers to complete their purchase but also fosters the loyalty that brings them back again and again.
Your shipping strategy will evolve as your business grows. Stay curious, review your performance, and don't be afraid to adapt. With the right setup, you can ensure that every package you send is another step towards sustainable, profitable growth.


.jpg)
.jpg)